 |
| Source : Internet |
Halfway of this year, the guys from
MongoDB launch their new backend as service product called
MongoDB Stitch. While the launch is just for the beta, the promise of the service is quite interesting. MongoDB has been around for long now and some development stacks have been based on its database product, the
MongoDB-ExpressJS-Angular-NodeJS (MEAN) and the
MongoDB-ExpressJS-React-NodeJS (MERN) stacks to name a few. These stacks, however, relies on backend technology such as
ExpressJS and
NodeJS. The idea of provisioning servers and developing the backend solution makes it daunting for small to medium scale applications.
MongoDB Atlas, at least made life much easier by providing on cloud database solution, but there must be a simpler solution, right? A solution the would stitch the backend and frontend together ( see what I did there ?).
 |
| Source : MongoDB Presentation |
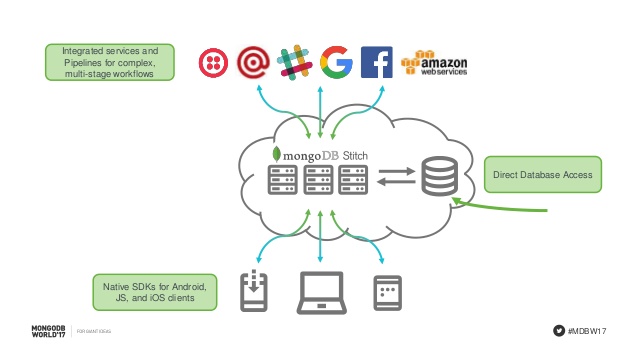
MongoDB Stitch lets developers focus on building applications rather than on managing data manipulation code, service integration, or backend infrastructure. Whether you’re just starting up and want a fully managed backend as a service, or you’re part of an enterprise and want to expose existing MongoDB data to new applications, Stitch lets you focus on building the app users want, not on writing boilerplate backend logic.
Stitch gives developers full access to MongoDB, the ability to declare fine-grained data access controls, and composability with other services. Initially, Stitch is available for MongoDB Atlas.
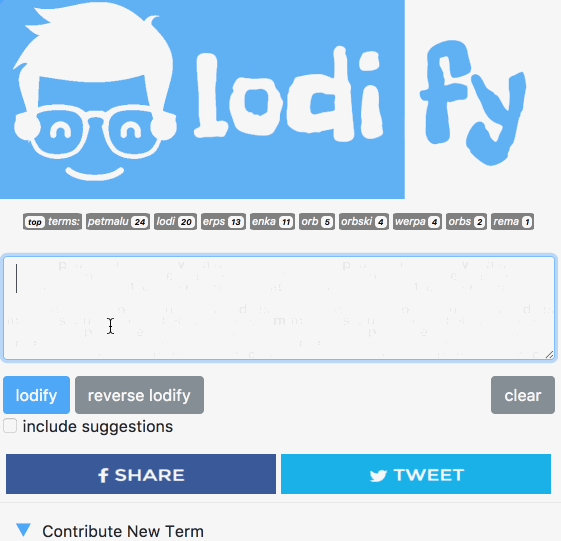
As a way to try out this new product, I decided to veer away from the usual "todo" app, that seems to be the new "hello world" standard for developers. The Philippine pop culture has been as creative as always and last month (or so), the Filipino millennial generation coined new slangs that have somehow trended a bit. Thus, to ride this temporary trend, I started writing up a simple web application utilizing just MongoDB Stitch and JavaScript. The app is as simple as it gets, it parses a Filipino phrase and translates it to the slang using the key-value pairs stored in the database. To add spice a bit, it keeps track of how may time a slang is used and allows users to suggest new terms. If you are interested, here's a link to the app,
Lodify.
What We Need To Get Started
- Code Editor
It's your own preference, personally, Visual Studio Code fro Microsoft
- MongoDB Compass or MongoDB Shell
This is optional, for you to view your collections. For free MongoDB Stitch users, you are not allowed to perform write operations directly into your collections using these tools.
- MongoDB Stitch Account
Of course, an account to access the service. There is a free tier if you just want to try it out. For pricing details and other information, you can visit their FAQ page. You can create a new account here.
I would assume a little background knowledge of HTML, CSS, JavaScript, and little MongoDB would be helpful. For the tutorial, I used the ECMAScript 6 features in my JavaScript code. I created a
ES6 Starter Kit with WebPack and SASS support for those who want to try out the "ES6 and everything nice" language features of JavaScript.
 |
| Source : Internet |
Setting Up MongoDB Stitch
Currently, MongoDB Stitch uses MongoDB Atlas as its cloud backend. An on-premise database support may be in the works. Your MongoDB Stitch account is the same as your MongoDB Atlas account, from now on, we simply refer to it as MongoDB Cloud account.
Creating your first cluster
Login to your MongoDB Cloud account. If you have not created your cluster, go ahead and create one. A detailed steps on how to create a cluster can be found on
MongoDB Atlas documentation. Here's a view of my cluster, it is a free tier M0 cluster with 3 nodes replica set. As I have mentioned, for free tier, you only have access to the primary node using the SDK. You can use the Connect button to get the connection string needed to access the cluster via your MongoDB Compass or MongoDB Shell
Create your Stitch app
Click Stitch Apps in your MongoDB Atlas console and then click Create New Application. Name your application, it my case I used i-lodi-fy. Wait for your application to initialize. Once initialized, you will be taken to the Stitch Admin page.
Configuring your security
For our application, we want to allow anonymous users to access our data. Turn on Anonymous Login.
Setup your collection
Create the collection/s needed by our application. In our example, we will use "lodi" as the database name and our dictionary collection as "dict".
Configure the access rules for our collection.
- On the AtlasCluster section on the admin sidebar, click on mongodb-atlas.
- Under the Rules tab, select the collection that we created ( i.e. "lodi.dict" ). You can also add new collections here.
- Click on the collection to view the read rules, write rule, the validation rule, and the filter rule.
MONGODB AUTHORIZATION

MongoDB Stitch rules do not override the read and write access (i.e. authorization) that may have been set up separately in MongoDB. That is, MongoDB Stitch rules determine whether the fields are
readable or writable; not whether the client has the authorization to read or write to a particular
database or collection.

Similarly, MongoDB Stitch validation rules do not override document validation rules set up
separately in MongoDB.
- For our app, anyone must be able to read and write into the database. There fore we set the Read, Write and Validation rule to {}. To read more about these rules, refer to this document.
NOTE

This setup is not recommended for production ready application. It is best to define more granular
rules to control the reads and writes. Especially the write operations.
- Delete any pre-existing filters on the Filter tab.
Our stitch application is now good to go. The next step is creating our front-end app.
Let us Build The Web App
If you prefer to look at the actual source to follow the discussion, download the source code
here.
For this example, I used Visual Studio Code as code editor.
Webpack is used as the module bundler, however, it was setup to bundle only our JS and CSS file.
Setting up our INDEX.HTML
To access the MongoDB Stitch library, we are going to use the hosted library file at Amazon. Add the following entry inside your Head tag.
<script src="https://s3.amazonaws.com/stitch-sdks/js/library/stable/stitch.min.js">
index.htmlWebpack does the bundling of our CSS and JS files, make sure that they are properly referenced by our page.
Lets begin coding
Let us begin by setting up Webpack to point to our entry JS file, index.js. This done on the webpack.config.js.If you intend to make use of a different file, make sure it is updated. Notice the output value, this is the file that should be referenced by our HTML page.
entry: "./app/js/index.js",
  output: {
    filename: "./app/dist/bundle.js"
  },webpack.config.js
On our index.js file, make sure that all file we need to place in abundle are imported. In our case, the SCSS file and two additional JS file.
import "../styles/styles.scss";
import * as lodifier from "./lodifier";
import * as localDB from "./data";index.js
Then we begin building our code by setting up connection to our MongoDB Stitch app and declaring the needed variables for the client and database.
let stitch;
let client;
let db;
const connect = () => {
  try {
    stitch = window.stitch;
    client = new stitch.StitchClient("i-lodi-fy-uhhdc");
    db = client.service("mongodb", "mongodb-atlas").db("lodi");
    return true;
  } catch ( err) {
    return false;
  }
}index.js
We created our client object via the call to the StitchClient function. The function takes a parameter, the App ID. This is the generated ID from the service when you created the application in the Stitch Admin. If you forgot the value, just log in to the Stitch Admin, it should be there. Then we created the database object, db, by creating a service that eventually calls the db function accepting the name of the database (i.e lodi). Optionally, we can create an object for the dict collection by calling the collection method of db similar to the code below:
const dict_collection = db.collection("dict");
index.js
To be able to use the Stitch Application, we need to log in. Even if we have turned on the Anonymous Login support, a login process is still to be done. This is to track individual access to the database via their generated "authed id". For our application, that information is not being used by our collection, The anonymous login is being done by calling the login() function of the client. This will return a promise which should be handled by our code.
const stitchLogin = () => {
  return client.login();
}index.js
Now that we have created a way to login to the Stitch App, lets create the method to retrieve the collection. We have configured our collection to be read-accessible by any user, thus, calling the
find function will return all entries. The function returns a promise, thus, it should be properly handled by the code.
const getTerms = () => {
  db.collection("dict").find()
    .then(result => {
      // ..process data here
    })
    .catch(err => {
      // .. do some error handling
    });index.js
IMPORTANT
Retrieving the whole collection for large system is not recommended. Add some filters and
implement some form of paging.
Before moving on with the write operations, lets take a look at the schema and sampla data.
{
_id: string,
approved: int32,
count: int32,
example: string,
flagged: int32,
lodi: string,
type: int32
}
{
_id: "kain",
lodi: "enka",
example: "Tara enka na tayo.",
count: 12,
approved: 1,
flagged: 0,
type: 0
}
Document Fields
- The _id field is the primary key for the document. The actual formal acceptable term or word serves as the key, this ensures that it is unique.
- The lodi field is the slang term.
- The example field contains an example phrase where the slang can be used.
- The count field holds the number of time the slang has been used.
- The approved field distinguishes an approved term from the admin and suggested terms from users. Initially, all terms or slangs submitted by users are marked as suggestions. The admins review these and approved them if need be. This avoids polluting an already polluted slang dictionary
- The flagged field will be used in a future enhancement.
- The type field will be used in a future enhancement
One feature of Lodify is to accept suggestions of terms from the user. Suggestions are terms that were submitted but is yet to be approved. To implement this, we use Stitch
insertOne function of the collection.
const addTerm = (term, lodi) => {
  return db
    .collection("dict")
    .insertOne({ _id: term, lodi: lodi, example: "", approved: 0, count: 0,flagged:0 });
};
index.js
Again, this call to Stitch returns a promise which should be handled by our code. A sample code to do just this can be seen below.
const add =() => {
  // .. codes here
  stitchLogin()
    .then(() => {
      addTerm(term.toLowerCase(), lodi.toLowerCase())
        .then(() => {
          console.log("Adding Done");
          // ..additonal codes here
        })
        .catch(err => {
          console.log("Failed", err);
       });
    })
    .catch(err => {
      console.log(err);
   });
};index.js
Ok, so we can add a new slang. How about counting the instances a slang is used and display the commonly used slang to the users? The
count field on our document is there to support this feature. The idea is that each time the slang or its equivalent term is encountered during parsing, we increment the count by one. To update our database, we use Stitch
updateOne function of the collection. And as always, it promises a return :)
const updateCount = () => {
  const counts = lodifier.getCounter();
  stitchLogin().then(()=> {
    counts.forEach(word => {
      update(word).then(res => {
        console.log(`${word} count updated :`,res);
      }).catch(err => {
        console.log("Failed Update", err);
      });
    },this);
  });
}
const update = (term) => {
  return db
    .collection("dict")
    .updateOne({_id:term},{$inc:{count:1}},{upsert:false});
};index.js
So there you go. Basically thats a CRUD operation on MongoDB Stitch without a D. I did not see any delete operation necessary for the front-end. The Admin Console is a different story, when I get the chance to build it. Right now, Im just using a console app running on top of NodeJS to manage my collections. But to quench your curiosity, here is what a delete function looks like. To delete a single term, I used the
deleteOne function.
const deleteOne = (collection, filter) => {
  db.collection(collection).deleteOne(filter)
    .then(res => {
      console.log("Success :", res);
    })
    .catch(err => {
      console.log(err);
    });
};index.js
Integration with MongoDB Stitch is, rather, straight forward. It is the setting up of the service that is somewhat tricky for beginners. The app did not require much of configuration.
Some Developer Notes
This tutorial have MongoDB Stitch as the main subject. However, it was also my first application built with ES6 and Webpack. Thus, there are some additional learnings along the way.
- Using ES6 features can cause your app to not work on older browsers. Most of the new features are not transpiled bt Babel out of the box, you need to install additional mpm packages.
- Webpack is confusing at first, I am using 3.6.0. The webpack-dev-server transpiled JS used the "const" and somehow Safari my old iPad Mini running iOS 9+ complains about not supporting the keyword in strict mode. After research, or sya stack overflowing, for solutions, I decided to use Phyton's ( God I miss Python!) SimpleHTTPServer to serve the site when testing it on mobile.
- I have trouble downloading the source map of the Stitch SDK hosted in Amazon S3 Server. I already raised this bug on their GitHub repo. While it did not cause me delays,I put it up just in case.
- GitHub is great hosting the app. Easy to setup. Then again, you can always drag and drop your site to BitBalloon.
So before I summarize this lenghty post, here is the app in action.
 |
| Source : trashvin.github.io/lodify |
In Closing
The new product offerring from MongoDB looks promising. Though I failed to utilize its other more complex features in this post, I believe theres plenty the developers would love. It is still in Beta phase, expect more improvement. In this time where a lot of solutions are moving towards the serverless approach, MongoDB Stitch is an option that you need to keep in your arsenal as a developer.
References
 |
| Source : happycode.com |
Feel free to leave your comments, suggestions, or questions below!
Happy Coding!

Comments